Monday 21 December 2015

Winning a swap!

So, I posted the picture of the cushion I made for the X-Factor Pillow swap and due to not being home in daylight I haven't been able to share a picture with you of what I received.
Well, I think I was a very very lucky swapper as I got this beauty.
It was made by the lovely Tiina, who is also the hostess of the swap and she was the receiver of my Christmas Cottage Cushion, so I feel like we had a little private swap.
The fabrics are perfect and I think are not just Christmassy, but are good all though the winter season......well thats my excuse for it to stay out longer!!!
I might add that due to the daylight this time of year my photos are not that great and I went to the brightest room we have!!
I am so pleased that I joined in with this swap, the formula is so simple. You make a cushion to the theme that is set and that you like, not for a set partner, then everyones cushions are shared anonymously and the makers get to vote the cushions in the order of their favourites. The cushion with the most votes gets the maker their first choice and works down the scores awarding cushions to everyone.
The best bit is you really don't know what you are getting in the post, as you can't guess that something has been made to your tastes, likes or dislikes.
This will probably be my last post of the year as I'm working right up until the big day, so all thats left is to say.........
....tis the season to hoot, drink wine and have fun with friends and family!!!!
And to thank Tiina once again xxx

Monday 7 December 2015

Christmas Cottage Holiday Pillow

I have been working like a madwoman and life has definitely taken a few bumpy roads over the last month, but I was determined to find some time to sew (to save my sanity!!) even if it was at midnight.
And sew I did, but it was of the secret sewing variety.............I made a pillow for the X-Factor Pillow Swap on Flickr!
This was my entry, The Christmas Cottage. I used a paper pieced pattern by Kerry from a book she contributed to called Playful Little Paper Pieced Projects. This block made me buy the book, so when I spotted that the theme for the pillow swap was Holidays, I knew just what to make.
I added two borders to the block to make it a decent size cushion cover and left quilting to a minimum.
It has a concealed zipper and very candy cane style striped binding.

 The details

Size - 20"x20"

It is a brilliant swap formula, as you only make a cushion to go with a theme, not for an actual partners likes and dislikes. So you just make what you love and hope someone else likes it.
I really love the finished cushion and hope that its new owner enjoys having it around for the festive season, as I really didn't want to part with it........ but it got posted off to is new owner this morning and I am eagerly awaiting my cushion to drop through the letter box!!  
Although, I have to say this secret sewing lark is soooooo difficult, you can send the organiser (the lovely Tiina/@Cottilello) sneak peeks, but I do love asking the whole of Instagram for advice on fabrics choices and sharing the whole process of the making and it was really tricky not to let anything slip to spoil the anonymous element of the swap!!
Remember you still have a few days left to link up your Christmas makes for Ho Ho Ho and On We Sew over here, for a chance to win some lovely Christmas fabric.  

Wednesday 18 November 2015

Ho Ho Ho and on We Sew - Grippy Christmas Stocking Tutorial

Hello and welcome to my stop on the wonderful year round blog hop Ho Ho Ho and on We Sew, which is the creation of Fiona and Paula, to help and encourage us to get ahead on our crafting and present making for Christmas. Each month you have the chance to link up your makes and be in with a chance of winning a prize and as a bonus, each of us along the way might have a tutorial for you. Last year I shared my Wrapping Sack and this year I decided to play around with the traditional Christmas Socking.
I love seeing all of the handmade socking hanging on mantlepieces, but in the UK the lovely socking hooks and holders are not that easily available, but after using gripper fabric for a thread catcher I wondered what else I could use it for and an idea was born. 
I'm not going to do a full stocking tutorial as there are LOADS on the internet, but I'm going to show you haw to add on a grippy pad to your handmade stocking.

You will need:

Your stocking pieces ready to assemble 2 outer panels 2 lining panels
1 - matching fabric for pad outer 2.5"x6.5"
1 - Grippy Fabric for pad base 2.5"x6.5" I got mine from this UK seller, but I know they have lots on Amazon.com
2 - cotton/muslin for sand sack 2.5"x6.5"
1 - matching fabric for tab 2"x4"
Play sand dried out (I left mine on a baking tray overnight)

First you need to assemble your inner sack to hold the sand, sew them right sides together, leaving an opening to pour the sand in. Trim corners and turn.

Next you need to assemble the outer of the pad, I quilted my top fabric to match the stocking. With the tab fabric fold in half long ways with right sides together and sew. Press the seam open and then turn the sewn piece to create a tube and then press with the seam central on one side.
Once you have done that you need to sew the back and front pieces together and insert the tab correctly (if you are not using a directional fabric this will be a lot easier).
First put the tab in the centre the top outer fabric with the seam of the tab facing up and the end of the tab at the bottom with the direction of the fabric (if it has one) the right way up. (Does that make sense? Pic 1)
Then roll the end of the tab thats hanging over up and pin it in place (Pic 2)
Get your rectangle of grippy fabric and put it dots down (right side facing) on the top of the outer fabric. You will NOT be sewing all the way around!!
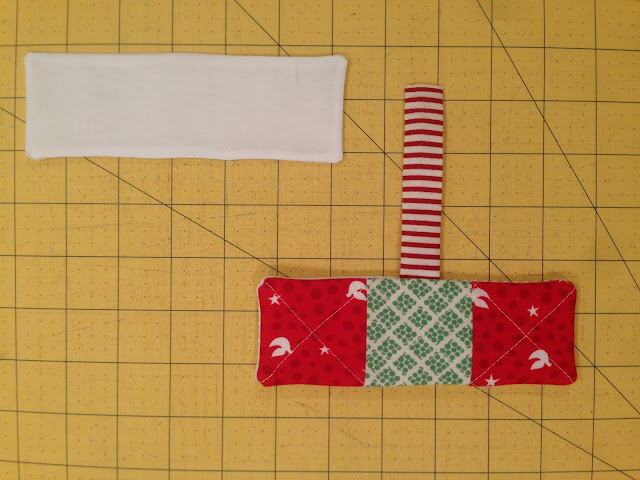
See Pic 4 with the pins showing for where to stop and start your sewing.
Trim the corners and turn the right way around. you should now have two items that look like this!!!
Next we need to get the pad into the stocking, take your backing fabric and one lining fabric. Lay the backing fabric right side facing up pin the tab in position (I put it about 1.5" in from the back of the stocking side), place lining fabric on top and pin.
Sew them together across the top, I double stitched over the tab and then press the seam open.
With the front of the stocking and the other lining fabric, place them right sides together and sew across the top, press.
We are nearly there, next you need to make it look like a stocking without sewing the pad into the seams, with right sides together put the now two stocking pieces together, lining with lining and outer with outer, sew all the around around leaving a good size opening on the foot of the lining. You need to make sure you pin the pad out of the way of the seam.
Turn the stocking the right way out and press, sew the turning opening closed.
Lastly get your dried play sand and using a piece of paper rolled up into a funnel put the sand into the cotton inner sack, not too much as you need to close it and get it into the outer pad. I sewed the opening shut on the machine. 

Put the inner sack into the pad and then hand sew it closed.
And you should have a very grippy christmas stocking!
I hope!
So, time to link your makes up and this month you have the chance to win half a metre of Lost and Found Christmas fabric by Riley Blake, which looks gorgeous.


Now these monthly link-up prizes would not be possible without the amazing generosity of the sponsors, a lot of them that I have had the pleasure of ordering from to supply my fabric addiction!!! 


Crafty Trimmings
http://www.patchworkelephant.com/

Logo Sew Hot

Plush Addict Logo


Quilting Fabric at the Fat Quarter Shop

Tuesday 10 November 2015

Rambling Rose Settler Shawl

A few weeks ago I managed to finish off my Settler Shawl, unfortunately it took me ages to block it and even longer to blog it, but here it is.
I would love to say this was a relaxing and peaceful knit, but unfortunately I turned it into a bit of a nightmare knit, by me not concentrating on the instructions and blindly knitting away................which resulted in a massive frogging session, sobs from me and very nearly chucking it in the corner to ignore. But I am so pleased that I ploughed on, it has finished as a beautiful delicate and really quite elegant shawl.
The problem started when the pattern told me to repeat two rows so many times and I counted them as pairs not as individual rows, (DOH!!) so knitted way too many. Also, I think I might have been a bit daunted by the border pattern, but that was really easy to do, once I got to it.
I ran out of yarn with just a bit of cast off to do, so instead of more frogging, I grabbed the tiny bit of one of my favourite yarns to finish with.
The Details

Knitting time - 6 weeks  (but not very consistently)

The yarn is soooo soft and really a pleasure to wear and to knit with and it even held up really well to the frogging, I find sometimes yarn can really fluff and split when you have to frog it. 
I can definitely see myself knitting another and a lot quicker now I know what I'm doing, I think it would make a good 1 Skein Christmas present make.   

Wednesday 28 October 2015

Easy Swap UK - What I made

After joining in with my first sewing swap earlier this year, I jumped straight in when Nina of BossyOz opened a swap for not just mini quilts. You could pick out of three items (mini quilt, pouch or tote bag) what you would like to have made for you and it was all UK based, which helps massively with the postage, both in times and prices!
So, way back in July we were given our partners and I did a bit of stalking and was lucky enough that I had met my partner Alice on a class in January at The Village Haberdashery, but with the summer holidays I didn't actually get any ideas about what to make.
Jump forward to the end of September and I realised my sewjo need a kick up the backside and I had a swap item to make. I had seen my partner liked triangles and using her mosaic as colour inspiration I set to work, on chopping up a lot of 3" squares to make 126 2.5" HST's. It was so much trimming that my rotary cutter died during it!
As I wanted to make a tote that I had made myself, so I knew the main mechanics of making it I knew just the pattern to use.
The Molly Market Tote.
I used lots of scraps and then added quite a bit of Cotton + Steel, Karen Lewis Textiles and the very new Carkai range by Caroline Friedlander for the front and back panels.  Then once they were made I just quilted them horizontally with Aurifil.
The handles, base and bias binding are all Essex Yarn Dyed in with Charcoal or black (I can't remember which one I picked from Annie at The Knitting & Stitching show!)
Inside was bike paths, with a lucien dot and one of my favourite Alexander Henry fabrics as the pockets.
The Molly Market Tote I made myself last year is really sturdy, still looking great and very useful size bag. 
As my extra item I made Alice a pouch to match, 
and as she is an avid knitter I added a little hand stitching to it. 
She received it today and I hope she likes it as it was very hard to part with and I think if your making something for a swap, the proof should be in the not wanting to part with it!!!! 
Just need to stalk the post for my parcel now........and say a MASSIVE thanks to Nina for organising and my swap mumma Amanda for cheering/kicking us all along. 

Monday 26 October 2015

Blogger's Quilt Festival - My Mini!!

It is that time of the year to show off your favourite makes to the lovely Amy who holds the Bloggers Quilt Market Festival to coincide with Quilt Market.  
Earlier in the year I signed up for the UK Mini Swap, was given a partner and then I started to worry. My partner was a modern loving lady and although I love a fresh modern quilt, I wasn't sure I could produce one! I'm (was) a bit of a whole fabric range, traditional quilt maker!
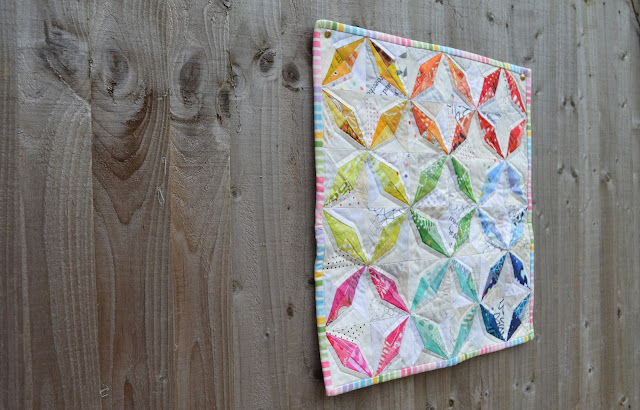
So, setting my brain to overdrive, wasting hours on Pinterest and arguing with Touch Draw I produced this..................
It measures 19"x19" and was inspired by the Cotton + Steel pattern Good Fortune by Rashida Coleman Hale. But the block were way too big, so I down scaled it on Touch Draw.
I used a massive range of fabrics, mostly from my scraps and a charm pack from Karen Lewis to create it.
I sent it off to the lovely Anna Marie back in April. I can honestly say I didn't want to part with it, but thankfully she loved it...........or I would have asked for it back!!

Blogger's Quilt Festival - Fall 2015
Hop on over and please vote for your favourite quilt in each category, especially if its mine!!!


Tuesday 15 September 2015

Liberty Summer Romper

Another thing that I never got to share here that I finished over the summer, is a Liberty Summer Romper that I made for Rose.
This is a free pattern that is available from Purl Soho and with the overlocker was a really quick make.
I made size 6-7 as Rose is quite tall and I wanted it to last a few summers.

I used less than a metre of fabric which I had bought in a sale ages ago for a bargain price and as I didn't have the right size elastic in my stash, I improvised with a slightly thicker one and made the channels slightly wider, so I like to justify to myself that this really was a free outfit!!!! 
The pattern and instructions are really clear and I can't believe that they give these patterns for free!! (not that I'm complaining, but I've paid for patterns with less instructions, photos and tips.)

The Details

Pattern - Summer Romper by Purl Soho
Fabric - Liberty Lifestyle Woolf in Pastel from Sew & Quilt

It was a big hit for holiday and was perfect to keep her cool in Spain, I can see lots more of these to come as the pattern goes up to age 11.

Thursday 3 September 2015

Pebble Beach Shawl - Take 2

Hello.......................long time no blog!!
It's been a while and things have been busy and blogging has taken a back seat in life and unfortunately so has sewing and knitting! But I thought to get me back into the swing of things I would share a few of my summer finishes over the next week. Yes I have actually finished something!!
Back in May The Pebble Beach Shawl Pattern had a update with two new sizes added to it and since my mum pinched my last one I thought it was a great excuse to cast-on one for myself.
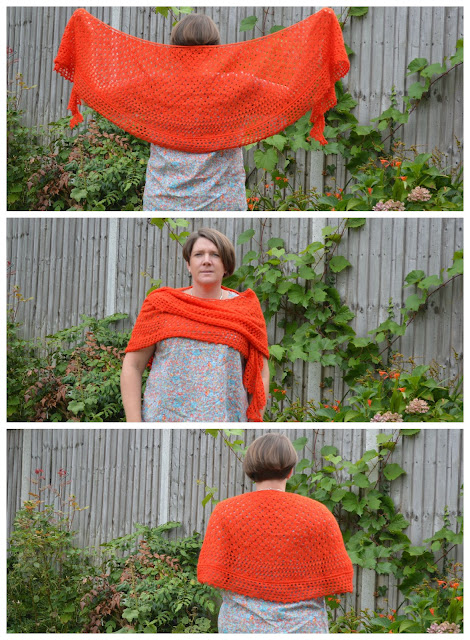
It is rather bright, but I wanted a shawl that would bring a bit of sunshine to autumn and winter and since I took some pictures of me wearing it this morning I haven't taken it off, so it is definitely giving me a bit of warmth on this chilly and damp day.
It is such a easy knit, but I think gives a finish that looks very delicate and pretty and using a solid yarn really shows off the pattern at it's best.

The Details

Size - Medium 
Yarn - 177 grams of Smitten II by Sweet Clement in Maple

And as you can see from these pictures, it is a beast of a shawl and is perfect for around your shoulders or wrapping it around and around your neck.
I think I will have to start yarn shopping for a large one!


Related Posts Plugin for WordPress, Blogger...